¶ Underbridge 2 pro Documentation
¶ 1️⃣ Introduction
Thank you for purchasing underbridge‑pro. With your help I’m able to maintain this program for three platforms — Windows, macOS, and Linux — and add new features and device support over time.
¶ 2️⃣ Installation
¶ 2.1 macOS
- Open the installer DMG.
- Drag the underbridge‑app into your Applications folder.
- Choose Replace if prompted.
¶ 2.2 Windows
- Run the installer.
- Follow the on‑screen instructions.
¶ 2.3 Linux
- Extract the archive.
- Copy the contents to a writable folder (e.g.,
~/underbridge-pro).
¶ 2.4 Unlock Your Copy
- Open the Register tab (tab 6).
- Enter your userid and the serial you received.
- Click Unlock – the program works offline after activation.
Note: Restart the application for the registration to take effect and unlock the remaining tabs.
¶ 3️⃣ Workflow
Close audio programs, browsers, etc., before launching underbridge‑pro. They can interfere with the audio/MIDI system.
¶ 3.1 Settings Tab (5)
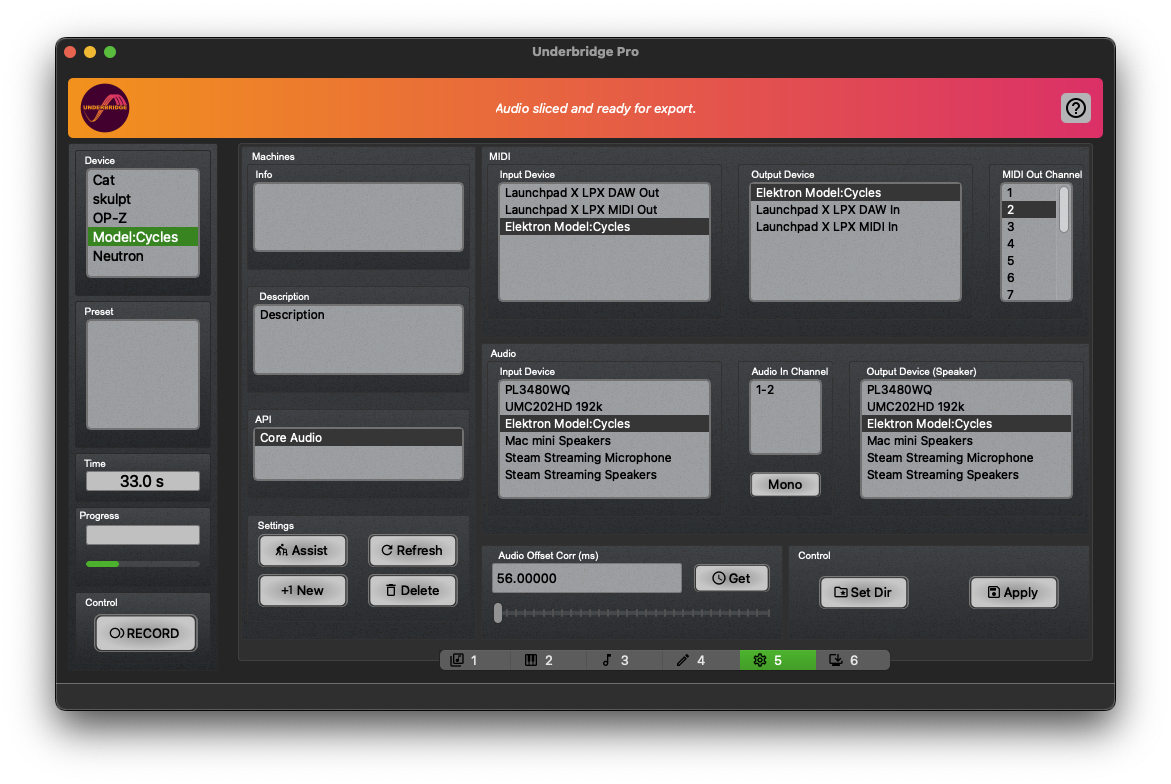
QUICK‑START: Choose your device → press Assist → set the working directory. The assistant will try to detect all necessary settings. Use this as a baseline.
¶ Video tutorial
https://peer.raise-uav.com/w/inuQtopYyoTXUcC2nenvJo
¶ Main steps
- Select a preset or click +1 new to create a fresh device preset.
- (Optional) Press Assist after selecting a preset to refine detection.
- Set MIDI In / MIDI Out ports.
- Choose the audio input you want to record (integrated device, audio interface, etc.).
- API: usually leave the default (first entry).
- Audio offset correction – adjust if recordings start clipped. Small positive values are typical.
- Define the working directory where recordings will be saved.
- Click Get under Latency to read hardware latency, then fine‑tune the slider.
- Save the configuration to a file for automatic loading on startup.
Tip: If recordings are cut at the beginning, increase the offset to the right (opposite of many DAWs).
Always click Apply after any change; otherwise the preset won’t be updated.
¶ Important device‑specific notes
- Model: Samples & Cycles – enable A+M mode (Device Settings) for the device to appear as an audio source.
- Windows – store the working directory outside the program folder so wave files can be written.
- Elektron Model:Cycles – the assistant may mis‑detect the audio device name; manually set the input/output to something like
DigitalAudioInterface(Elektron…).
¶ 3.2 Record Tab
¶ 3.2.1 Teenage Engineering OP‑Z
¶ Structure Tab
| Field | Description |
|---|---|
| Name | Project/pattern name (used for file names). |
| Tempo | BPM of the project. |
| Bars | Length of the longest pattern (1‑10). |
| Patterns | Number of patterns to record (1‑10). |
| Tracks | Number of device tracks (read from devices.yaml). |
| Tails (sec) | Extra recording time for reverb/delay tails. |
¶ Settings Tab
- Exclude Mods – omit MIDI/audio effects for a dry export.
- Rec_Mode – Project (record all patterns sequentially) or Pattern (single pattern).
- Capture Audio – generate WAV files.
- Capture MIDI – also save MIDI files.
¶ Recording
- Press RECORD → both audio and MIDI are captured simultaneously.
- Progress bar shows elapsed time.
- After recording, click WAVES to save or EDIT to open the non‑destructive editor.
Backup tip: Save the raw WAV files before opening the editor.
¶ Recommended OP‑Z MIDI Settings
| Button | Default Channel |
|---|---|
| BD | 1 |
| SD | 2 |
| HH | 3 |
| Perc | 4 |
| Bass | 5 |
| Lead | 6 |
| Arpeggio | 7 |
| Chord‑ | 8 |
Verify each channel in the OP‑Z app; the yellow rectangles in the screenshot highlight the defaults.
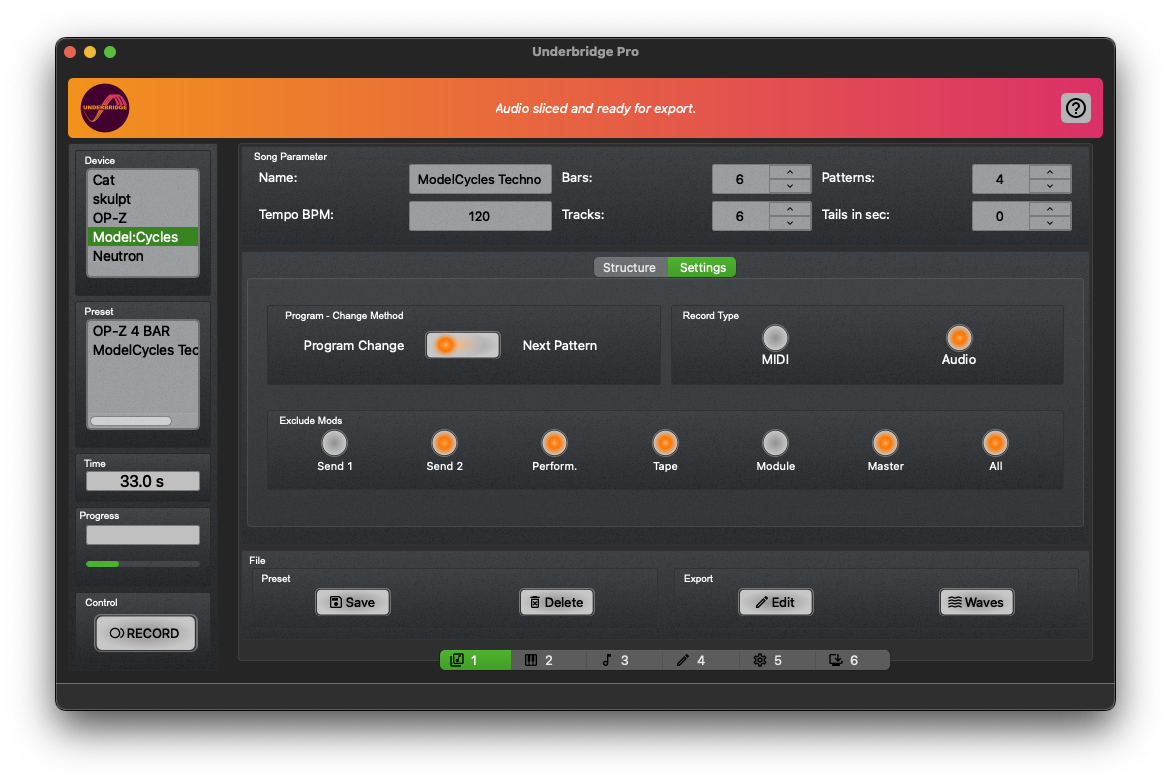
¶ 3.2.2 Elektron Model:Cycles
The USB audio output can clip; lower the channel “Level/Data” to avoid distortion.
¶ Structure Tab
Same fields as OP‑Z plus:
- Select Pattern – choose starting bank/pattern for a Project recording.
- T1–T6 – map to the six banks (A‑F).
- Rec_Mode – Project or Pattern.
¶ Settings Tab
- Capture Audio / Capture MIDI – same as OP‑Z.
- Set device to Program Change mode (required for Project mode).
¶ Recording
Identical workflow to OP‑Z (RECORD → WAVES / EDIT).
Example Project Recording
- Choose Bank B2 (Trigger 2).
- Pick Pattern 8 as the start.
- Set Patterns = 4 → underbridge records patterns 8‑11 (six tracks each).
¶ Required MIDI Settings (Cycles)
| Setting | Value | Picture |
|---|---|---|
| MIDI Clock In | On (sync tempo/start) | 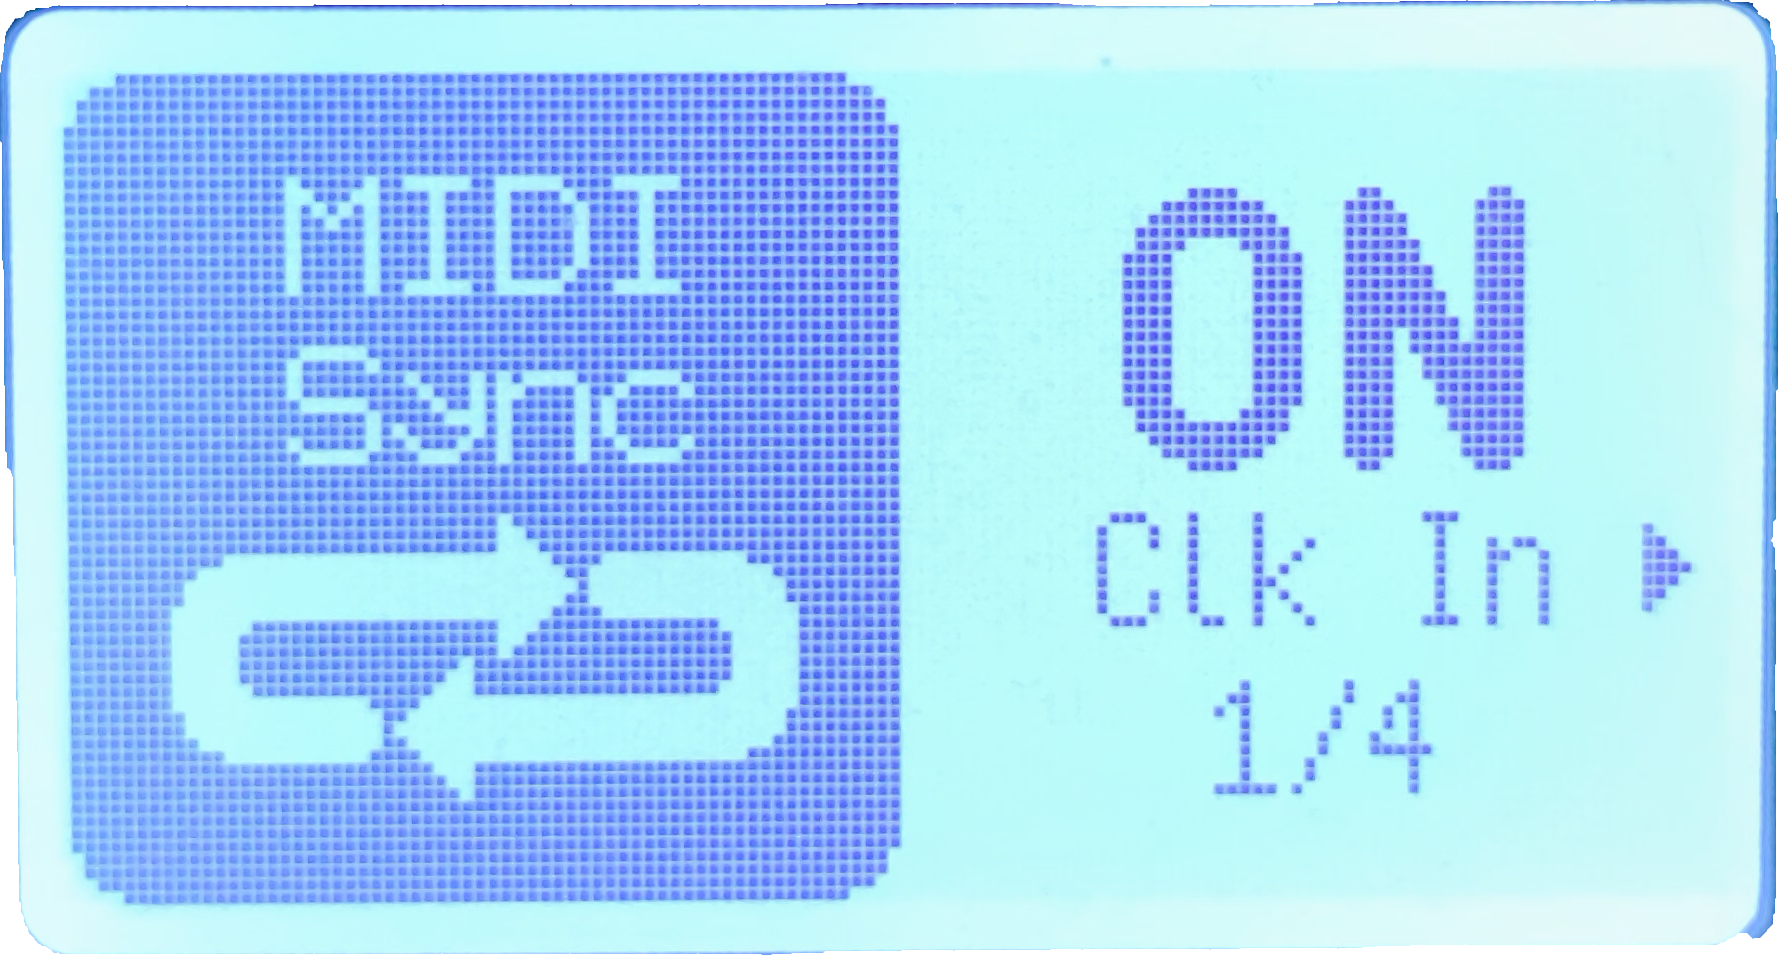 |
| MIDI Input (USB) | Enabled (also DIN if used) | 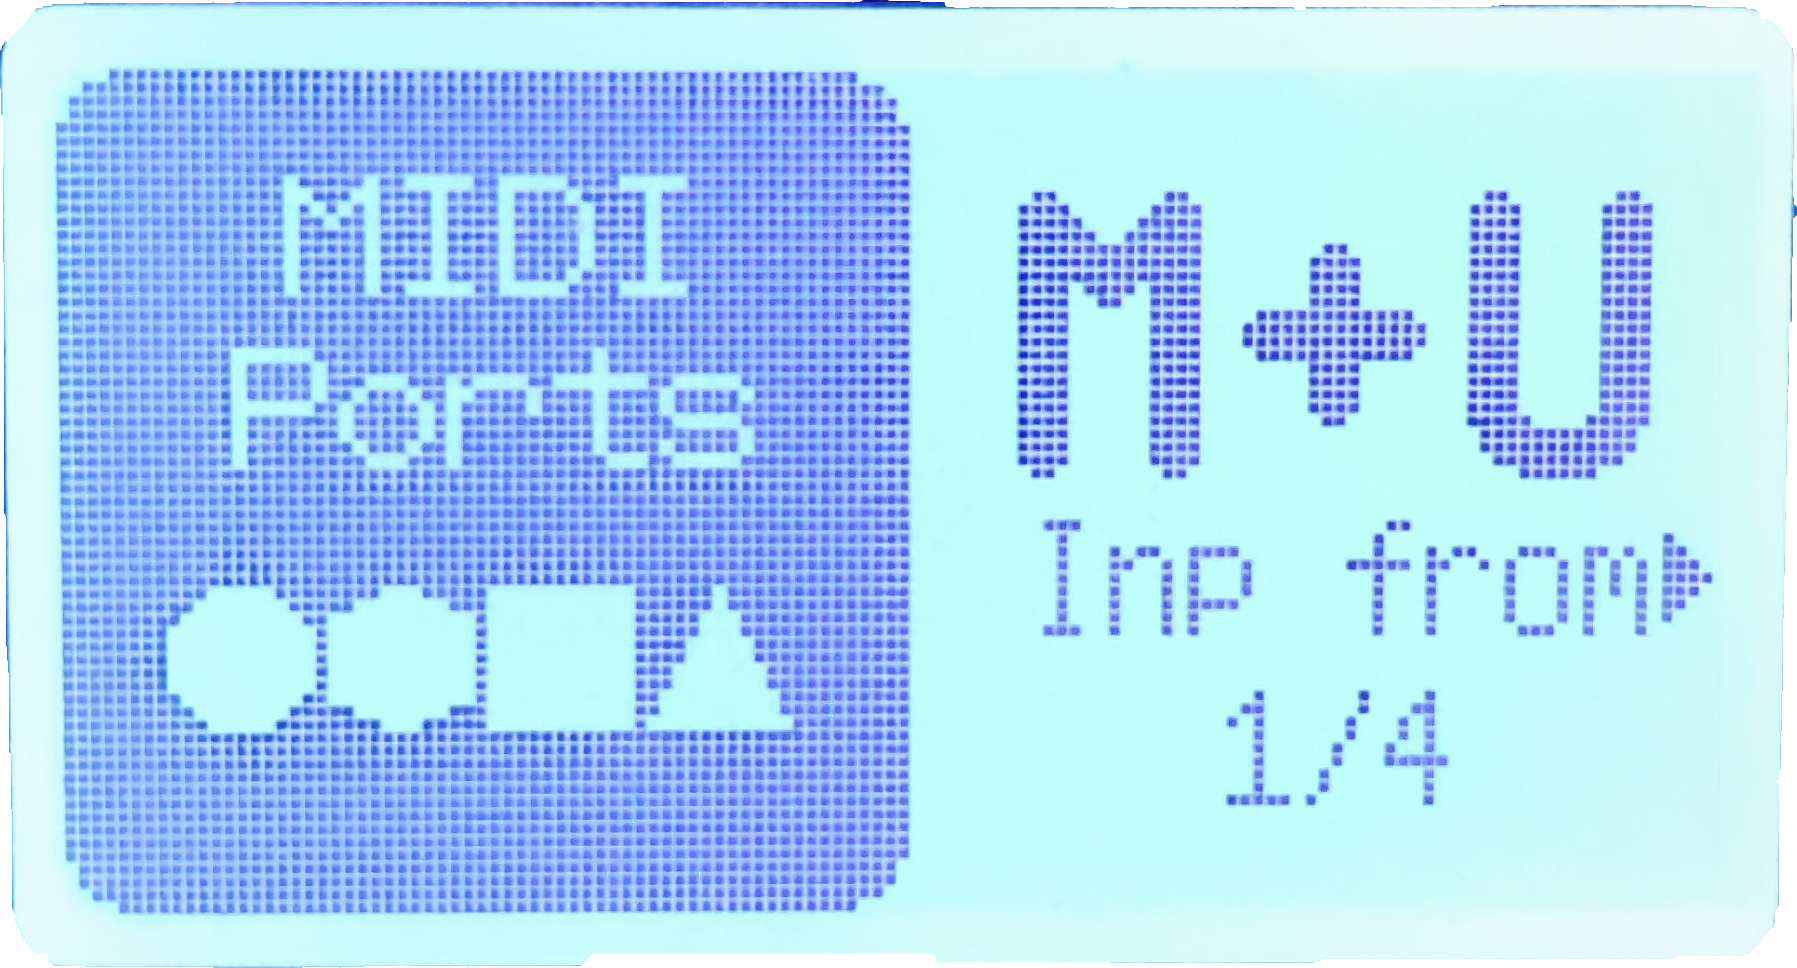 |
| Program Change | Enabled for Project mode | 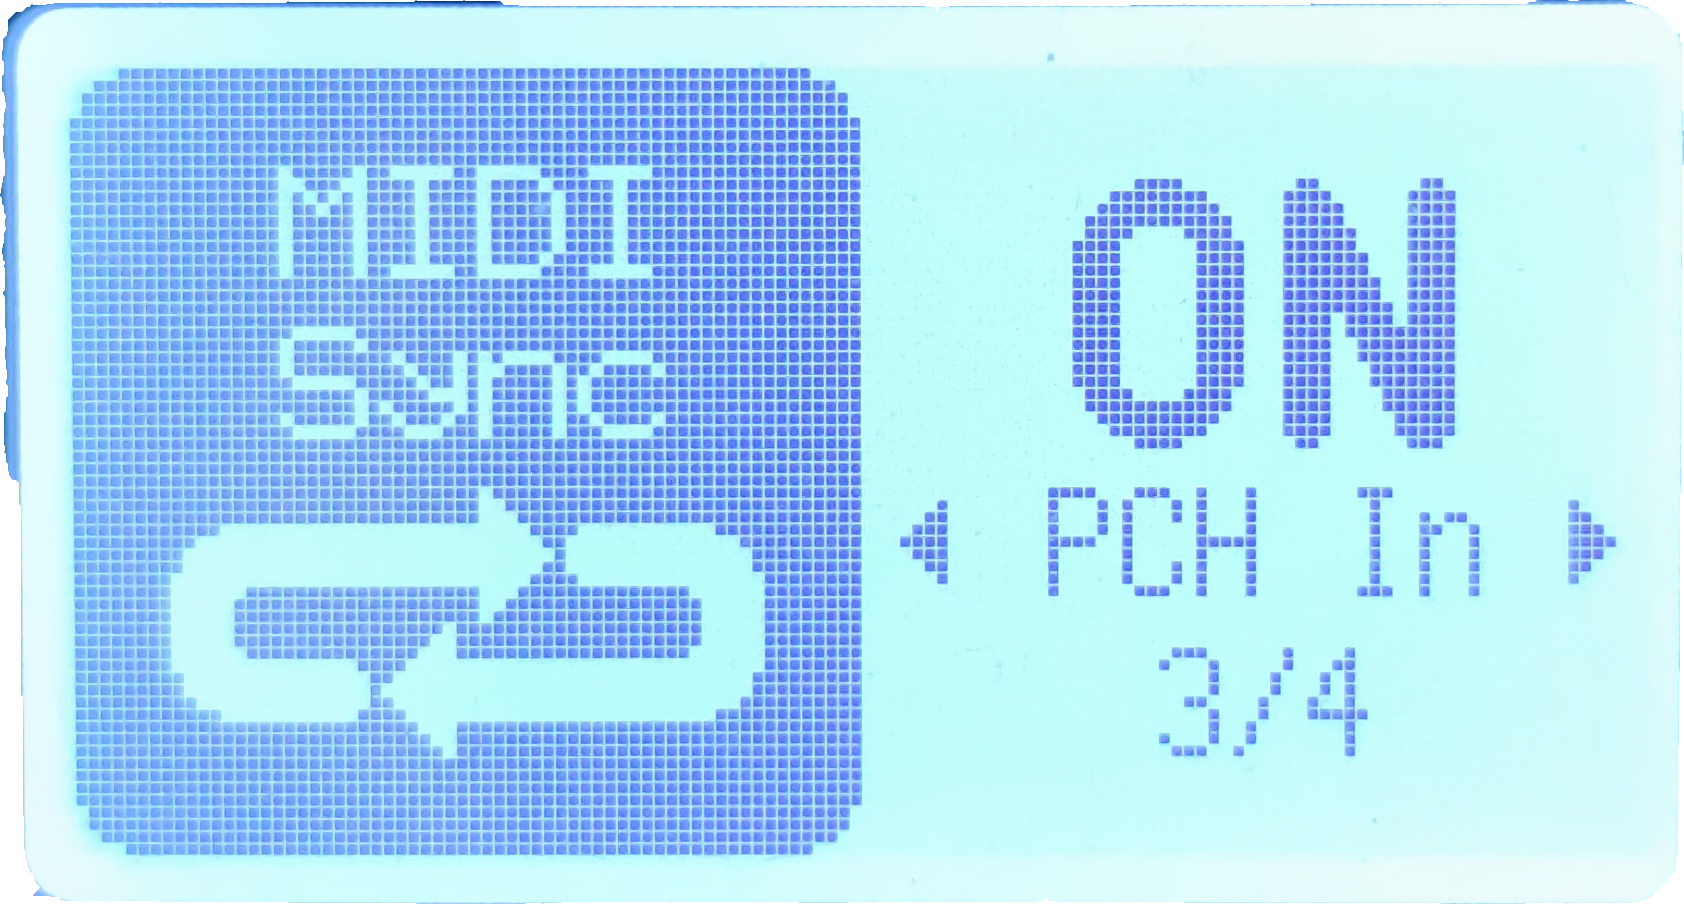 |
| Program‑Change Channel | 16 |  |
| CC Filter Pass‑Through | Enabled | 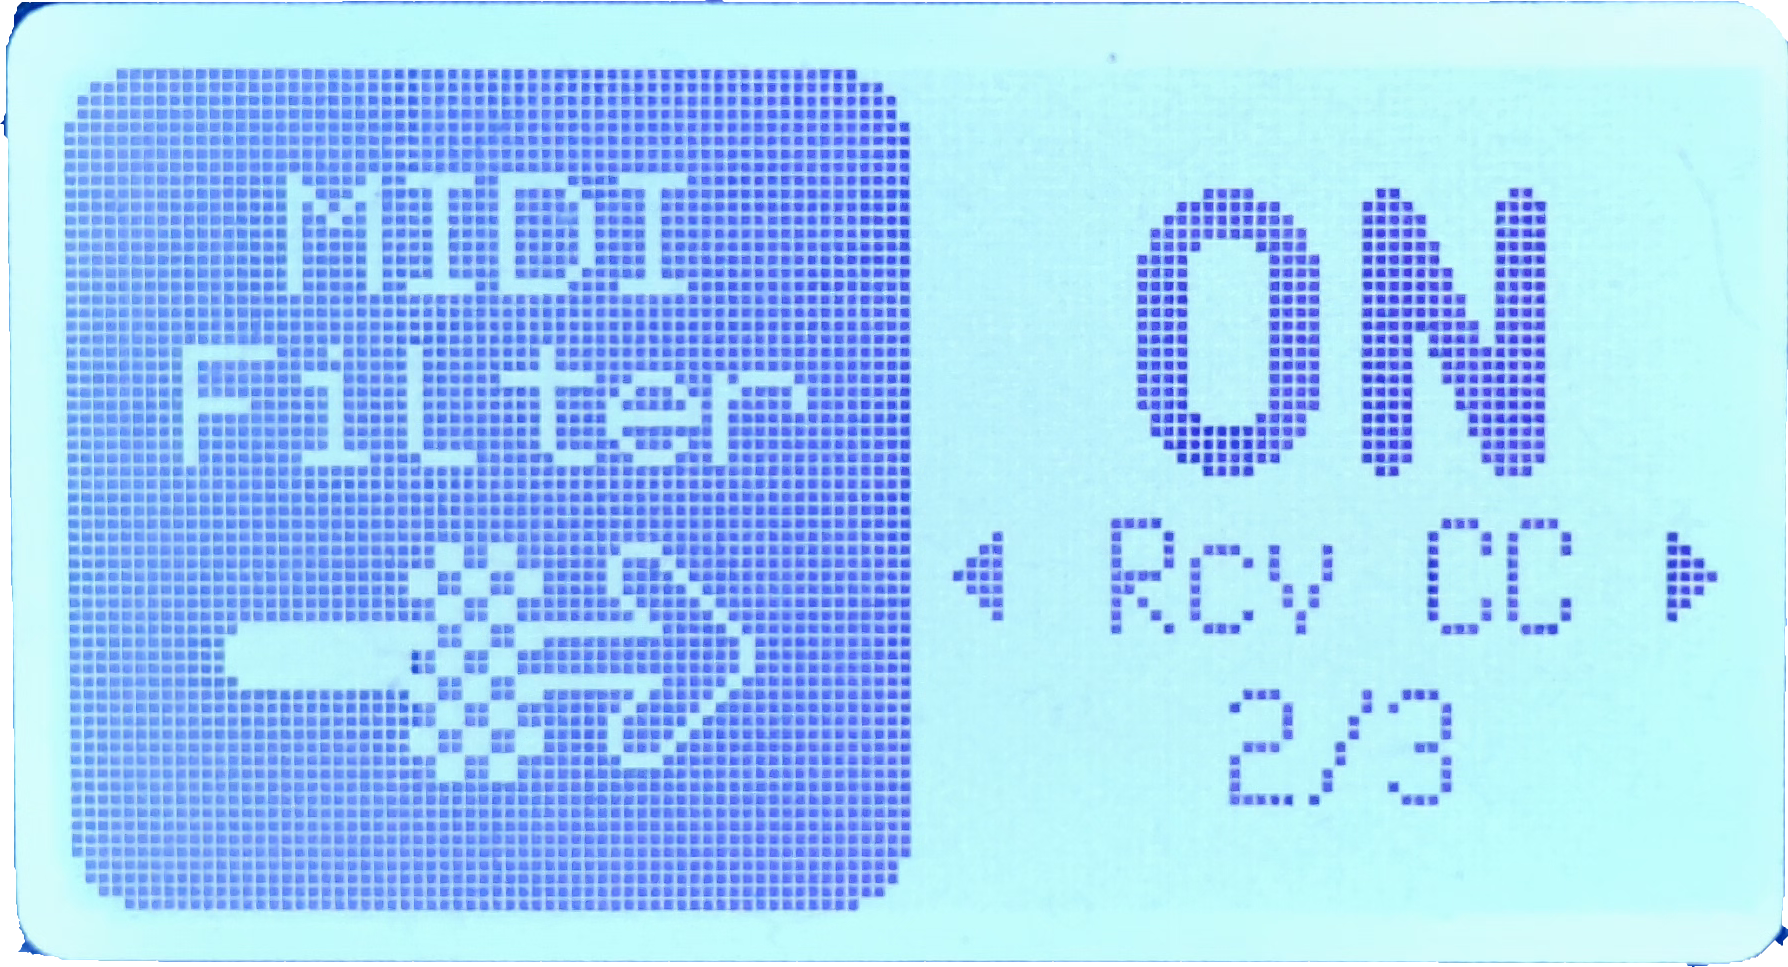 |
| MIDI Out | Enable for each desired channel | 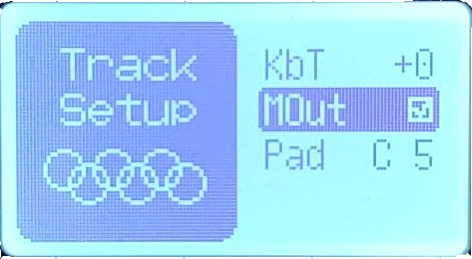 |
These defaults generally do not interfere with normal operation.
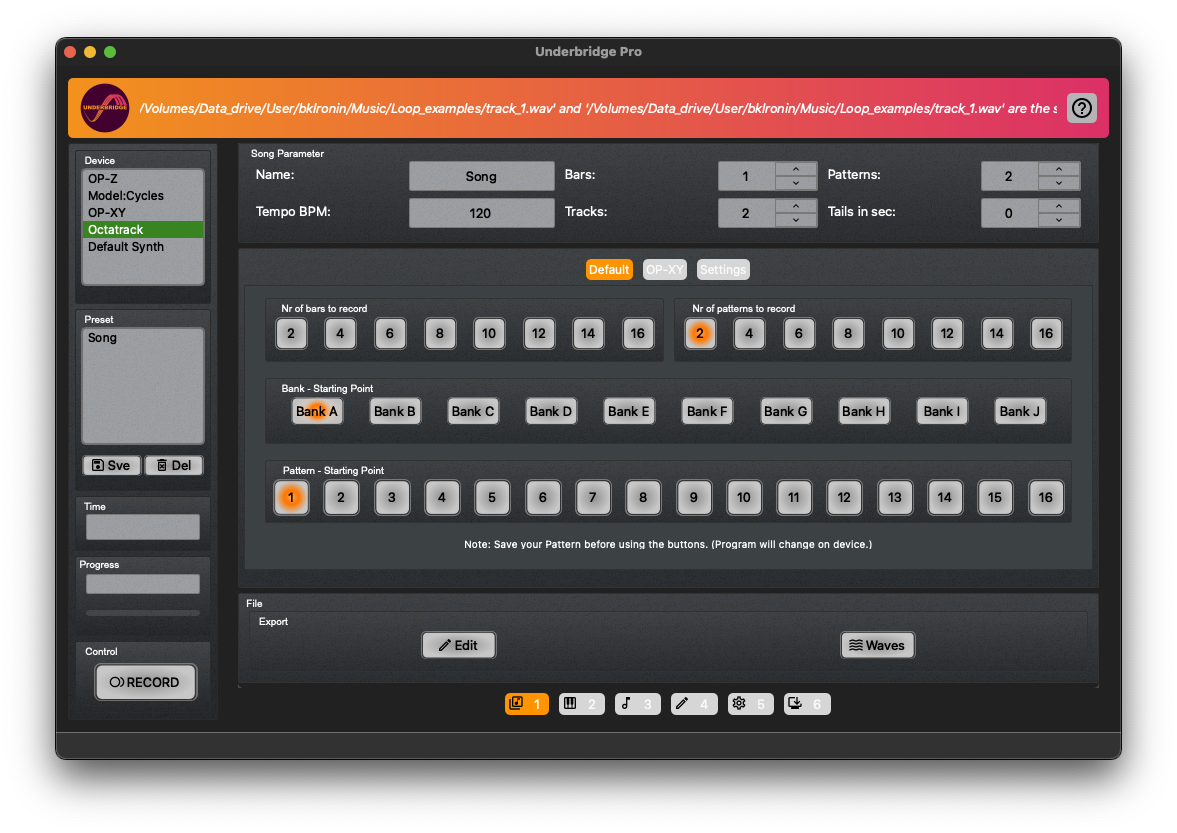
¶ 3.2.3 Octatrack
Coming soon – similar to Model:Cycles; select the Octatrack preset before configuring audio.
¶ 3.2.4 OP‑XY
Partially functional; some users report fully separated stems.
Quick Steps
- Open Settings → select OP‑XY preset.
- Assign MIDI In/Out and Audio In/Out.
- In the Record tab → Settings sub‑tab → set Program Change mode, BPM, etc.
- Press RECORD.
Full Guide
- Choose OP‑XY as device.
- Verify MIDI & audio routing.
- Match Underbridge tempo to the XY project.
- Set Bars, Tracks, and Program Change Method = Prgm Chng (not Dual CC).
- Disable MIDI output (still experimental).
- Record → Waves → separate files appear in the Multitrack folder.
Provided by Julian Hoffman Beechko.
¶ 3.3 LIVE Tab
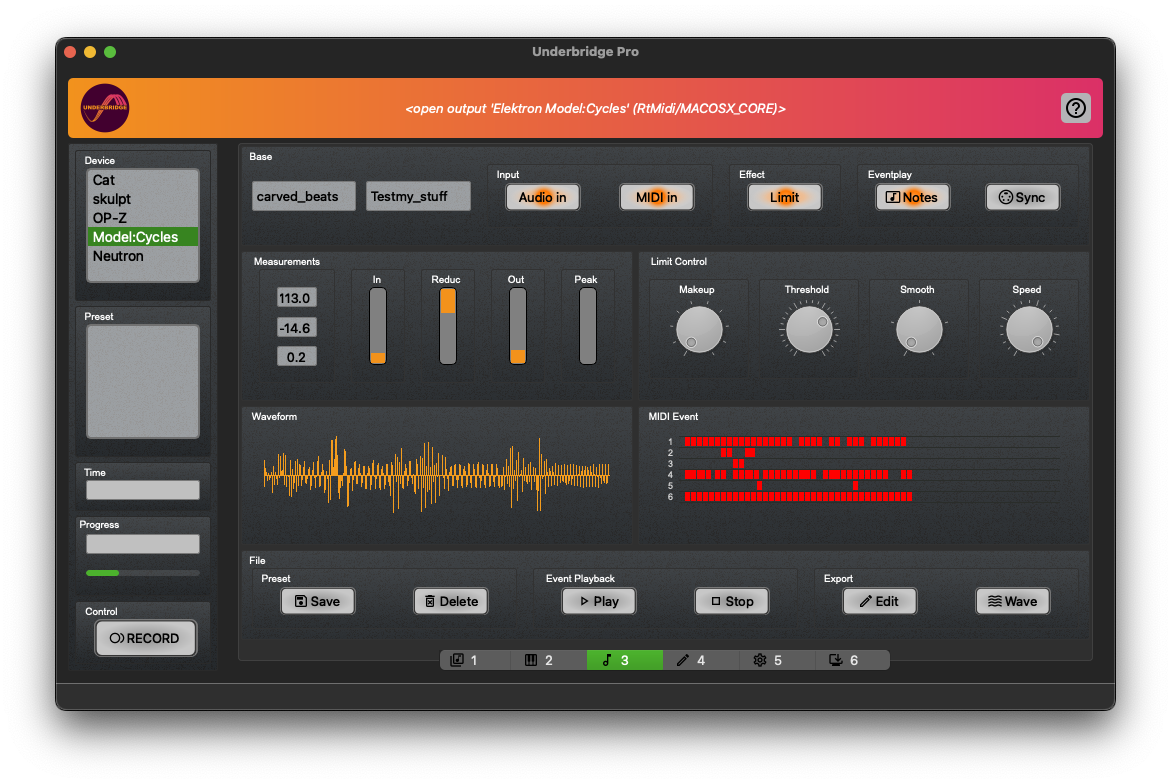
Designed for jamming, live performance, or routing audio hardware. Works alongside the OP‑Z macOS app.
¶ Setup
- Choose Input and Output in the Connection tab (avoid using the same device for both).
- Set a working directory for multitrack recordings.
- Click Save – audio initializes when you switch presets.
¶ Limiter Controls
| Dial | Purpose |
|---|---|
| Threshold | Level at which limiting starts. |
| Makeup | Boost after limiting (adds slight noise). |
| Speed | Release‑time analogue; keep centered for smoothness. |
| Pump | Reaction speed – left = smoother. |
Caution: High Pump + high Makeup can cause sudden volume spikes.
¶ RECORD
- Stereo‑mix recorder (USB or analog input).
- Enter Artist and Project name, then press RECORD.
- Optionally record MIDI alongside audio (select “M‑>” entry).
- After stopping, you can send the file to the Editor for further processing.
Keep recordings ≤ 60 min for optimal stability.
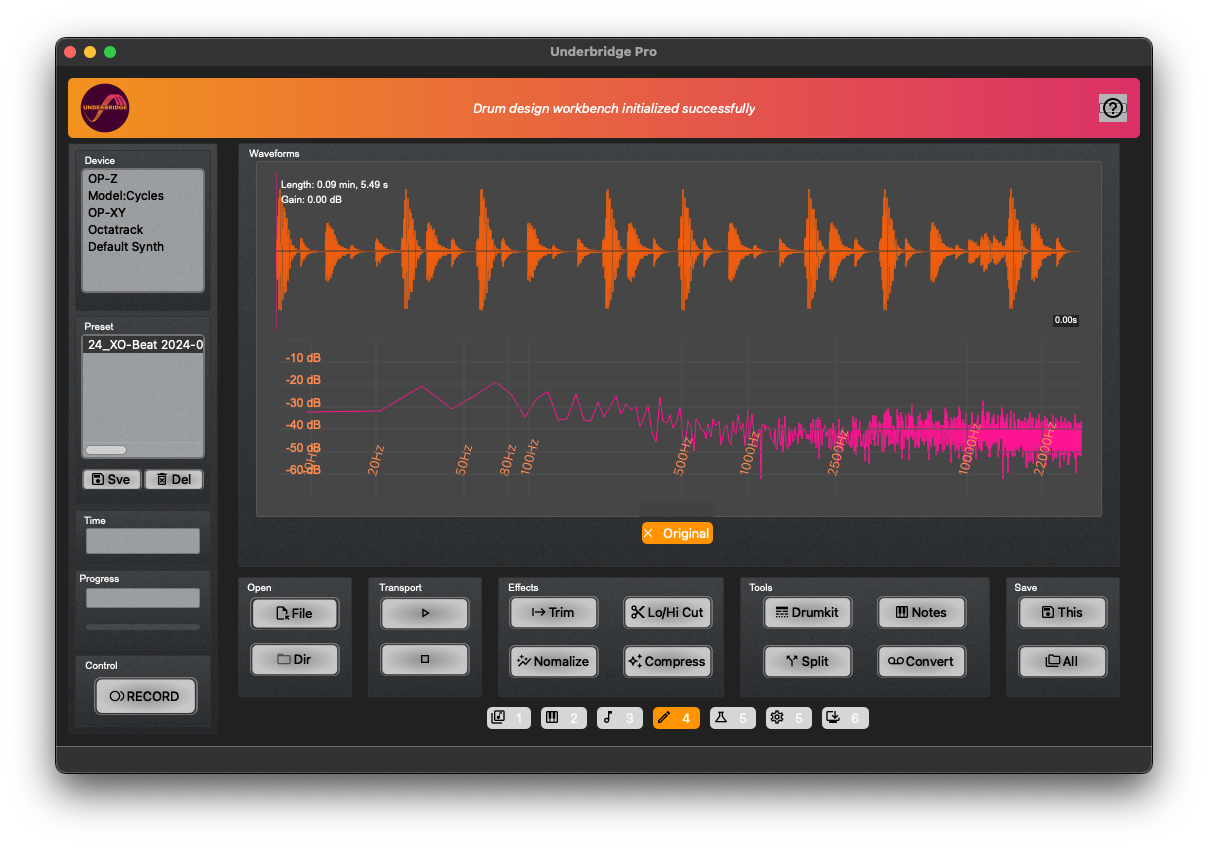
¶ 3.4 Editor Tab
 )
)
¶ Effects
| Effect | What it does |
|---|---|
| Trim | Cuts leading/trailing silence. |
| Lo‑High Cut | Removes unwanted low/high frequencies. |
| Compressor | Levels dynamics; set sliders → Apply. |
| Normalize | Raises peak to target level; use preset or slider. |
¶ Tools
- Separate – splits audio into percussive vs. harmonic content (useful for extracting drums).
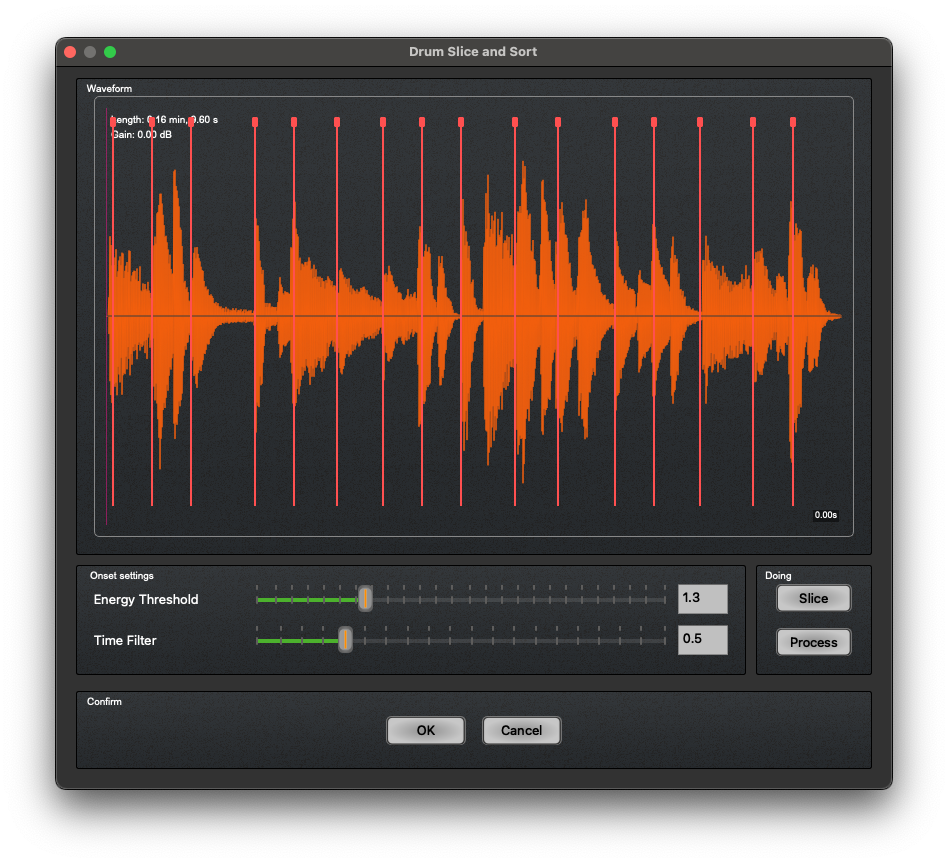
¶ Drumkit - Drum extractor and sorter
isolates percussive hits, sorts them low→high, and exports individual samples.
The resulting wave contains sorted BD, SD,HH. (When sufficient samples where found)
Adjust Energy and Time filters, then press Process
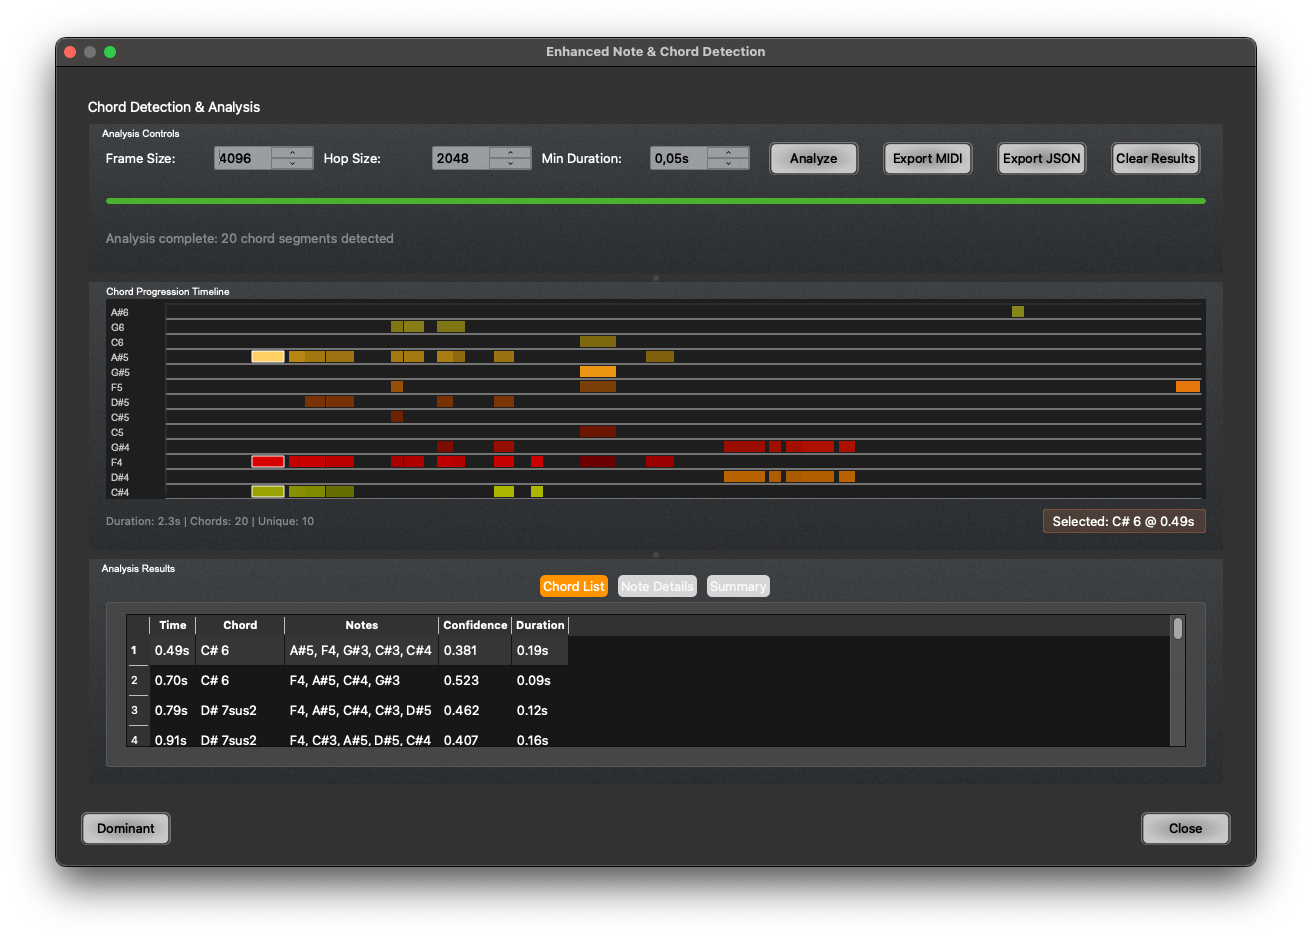
¶ Note - Chord Detection
Detects musical notes and chords.
Press analyze after you have loaded a wave file in the Editor and it will show you what notes and chords the track consists of.
It is not an exact representation but it should help to get an idea of a composition.
You can export it as MIDI or Json.
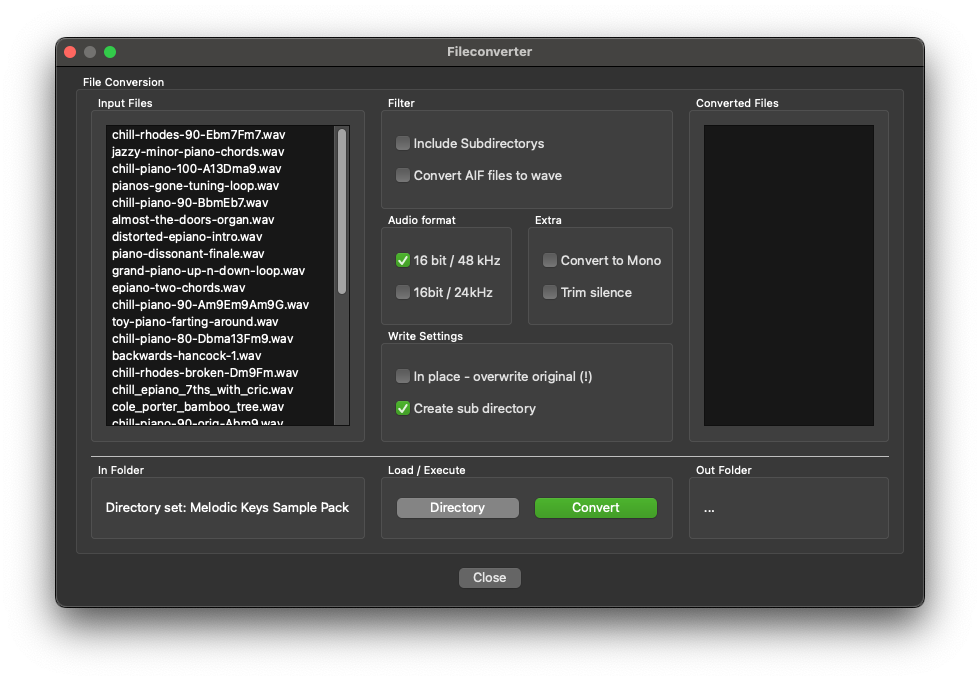
¶ Convert – batch converter
Convcerts entire folders for hardware samplers (e.g., 24‑bit conversion for Sonicware Sampletrek, AIFF→WAV for OP‑1).
This is independent from what you have loaded in the editor.
Load Directory with the button at the buttom then press Convert
¶ 3.5 Autosampler
Creates a multi‑sampled SFZ instrument from notes C1 → C7 with up to four velocity layers per note. Loops are auto‑detected for sustained playback.
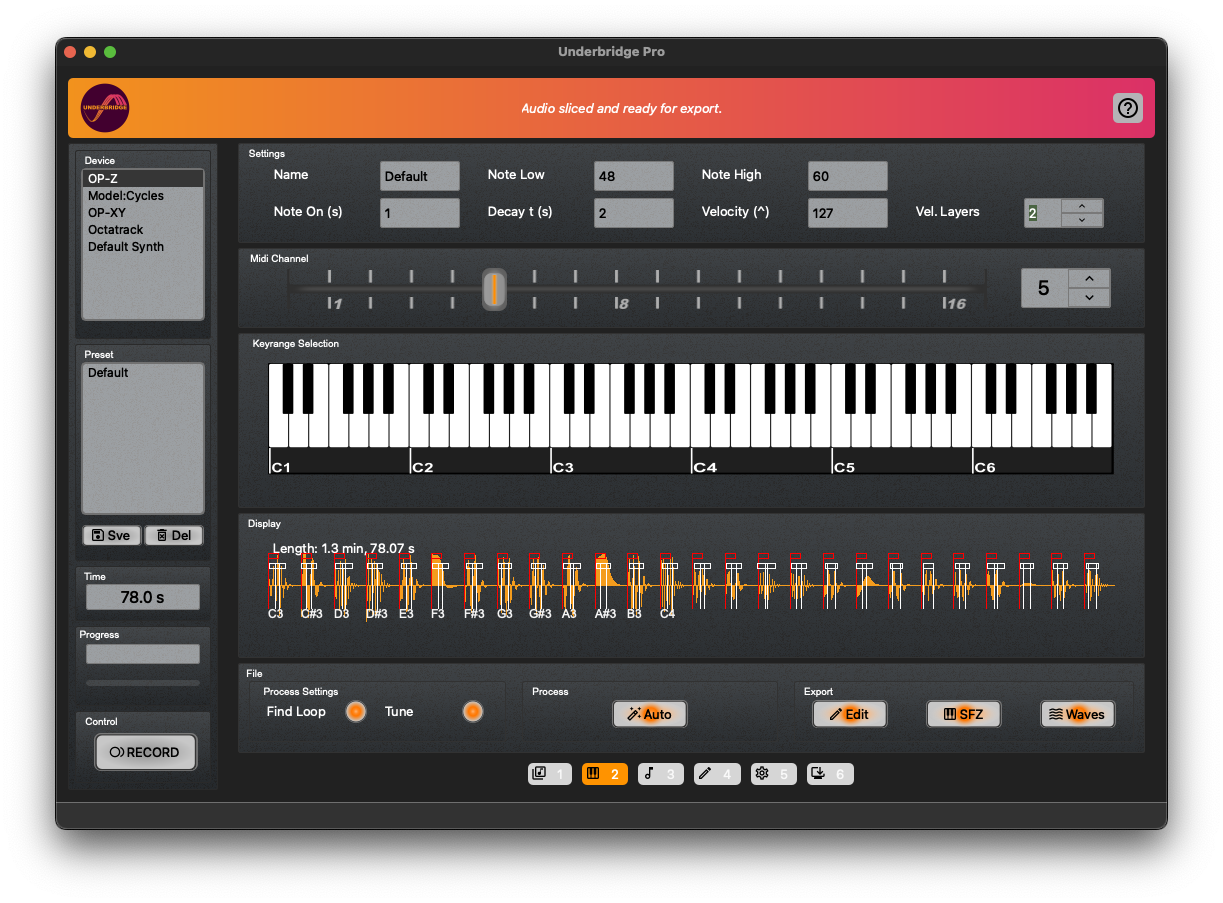
Key Parameters
| Parameter | Meaning |
|---|---|
| Name | Instrument name (used for filenames). |
| Note Low / High | Range to sample. |
| Note On (s) | Duration of key press. |
| Decay (s) | Post‑release capture time. |
| Velocity^ | Max velocity for the top layer. |
| Vel. Layers | Number of velocity layers per note. |
After recording, click AUTO → slicing, loop detection, and tuning. Export as SFZ for use in Bitwig, Kontakt, etc.
¶ 3.6 Drum Recycler
This workbench is for creating new exciting drum samples by decomposing drums into their hit and tone content. The created waves are then automatically adjusted and can be fused to new drums. It is a quite fast method without cutting or filtering certain aspects. By not just layering, the drum sound is cleaner and precise.
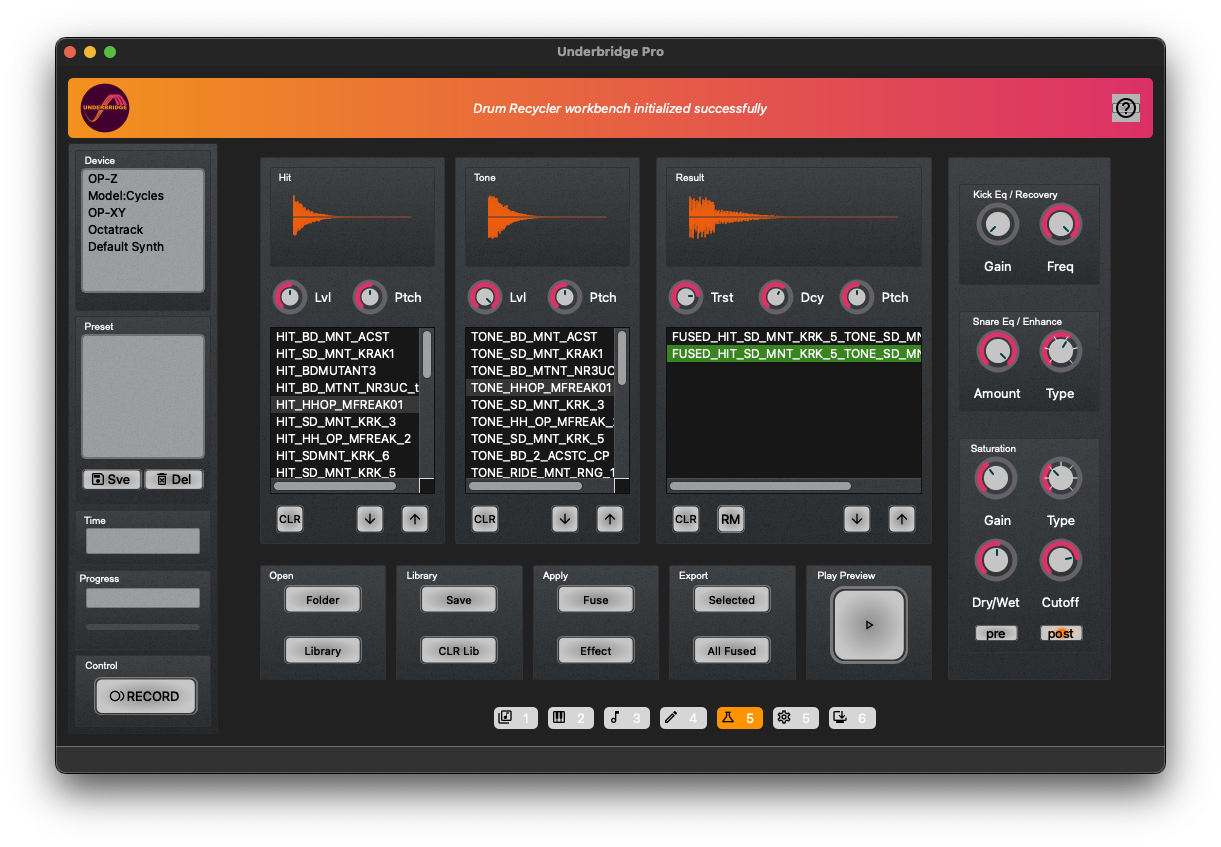
¶ 3.6.1 Fuse Samples
- Select a folder with drum samples that contains wave samples. Load Folder
-> Files will be imported and prepared. Extracted sounds that are not suitable for fusing are discarded automatically. - In the "Hit list" select a sample, this will be out hit transient for the new drum.
- In the "Tone list" select another sample, this will be our tone or body component of the snare. Use the slider to adjust the volume level of the tone. This is automatically calculated from the samples as a starting point.
- Press Fuse to create a drum from these two components. It will be added to the third list on the right.
-
You can press Save to Lib on a selected sample and it will be saved to the internal library,
-
Press Load Library to load all your saved samples back into the Drum Recycler.
-
Press export wave to save the fused creation to a directory.
-
Clear single columns with the CLR buttons. CLR Lib will clear your entire library.
¶ 3.6.2 Drum Recycler Effect Section
This section features specifically tuned efects to sculpt the created samples even further into a desired direction. The effects can be previewed with the square play button thats labeled "play/preview" or the spacebar. You can then safe the effects with the apply button non destructive to the sample. The effects are then baked into the sample on export. Swiching trough the result column samples will load previously made settings.
-
Kick Eq recovery
We might lose a bit of frequencies in the seperation or want to boost low frequencys on kick drums.- Gain sets the gain of the applied low shelf boost while frequency sets the frequency in a pre defined area.
-
Snare EQ enhance
This applies a secret effect chain specifically to make snares sound precise and declicious.- Adjust desired maount with amount dial.
- Select one of 6 presets that sounds good to you, with type
-
Saturation
Add saturation to the sample.- gain sets the input amount for this effect.
- type selects one of 7 different saturation characteristics.
- dry / wet lets you process in parallel with the original signal or fully replaced by the effect.
- cutoff applies a lowcut to the sample that is either applied pre or post the saturation selected by the toggles beneath it.
¶ 3.7 Custom Device
Add a device via +1 New on the Settings page.
- Minimum: a CC for “mute” and the number of tracks.
- Use the official MIDI device ID (visible in the Connection tab or via
lsusb).
Custom devices follow the Elektron sequencing model (continuous MIDI clock, separate start signal).
¶ 3.8 Update Tab
Check for updates, download new releases, and view changelogs.
¶ 3.9 About Tab
Enter your e‑mail and activation token (offline). Logs are stored in config.ini.
Send the error log from this tab before contacting support.
¶ 4️⃣ Known Problems & Solutions
¶ 4.1 General Advice
- Connect and power on your device before launching underbridge‑pro.
¶ 4.2 API Specific
- Best results with ALSA (Linux), MME (Windows), and CoreAudio (macOS).
¶ 4.3 OS‑Specific
¶ Windows
- Enable the “Synthesizer OP‑Z” sound device (click Allow).
- Manually set audio input for Model:Cycles (e.g.,
DigitalAudioInterface(Elektron…)).
¶ macOS - old versions
- If recorded WAV files are empty, try Apple’s fix: https://support.apple.com/en-us/HT209175.
- For permission issues on newer macOS, run the executable inside
Ubridge‑pro.app/Contents/MacOS/from Terminal to trigger the OS prompt.
¶ Linux
- No known issues.
Most problems stem from OS permissions or API selection; adjusting those usually resolves the issue.
¶ 5️⃣ Open‑Source Libraries Used
- Python – the language itself.
- mido – https://github.com/mido/mido
- PyAudio – https://people.csail.mit.edu/hubert/pyaudio/
- PySide – https://pypi.org/project/PySide/
- Nuitka – https://nuitka.net/
- pydub – https://github.com/jiaaro/pydub
Incredible people. 
¶ 6️⃣ End‑User License Agreement (EULA)
**End User License Agreement (EULA)
for "underbridge-pro" hereinafter referred to as Software or Software Product.
IMPORTANT!
PLEASE READ THE TERMS AND CONDITIONS OF THIS LICENSE AGREEMENT carefully before proceeding with the installation of the program: raise Inh. Thomas Herrmann End-User License Agreement (EULA) is a legal agreement between you (either an individual or a legal entity) and raise Inh. Thomas Herrmann for the köllisch software product(s) and possibly related software components, media, printed materials and online or electronic documentation. By installing, copying or otherwise using the software product, you agree to be bound by the terms of this EULA. This License Agreement constitutes the entire agreement concerning the Program between you and raise Inh. Thomas Herrmann and supersedes all prior agreements, representations, or understandings between the parties. If you do not agree to the terms of this EULA, do not install or use the SOFTWARE PRODUCT.
The SOFTWARE PRODUCT is protected by copyright laws and international copyright treaties, as well as other intellectual property laws and treaties. The SOFTWARE PRODUCT is licensed, not sold.
1. License Grant
The SOFTWARE PRODUCT is licensed as follows:
(A) Installation and use. The raise Inh. Thomas Herrmann grants you the right to install and use copies of the SOFTWARE on your device on which a properly licensed copy of the operating system for which the SOFTWARE PRODUCT was developed is installed.
(B) Backup Copies. You may make copies of the SOFTWARE necessary for private backup and archival purposes.
(C) You may install and activate the PRODUCT on an unlimited number of devices as long as you own them.
2. Description of other rights and restrictions
(A) Maintenance of Copyright Notices. You may not remove or alter the copyright notices on any copies of the SOFTWARE.
(B) Distribution. You may not distribute copies of the SOFTWARE PRODUCT to any third party.
(C) Prohibition of Reverse Engineering, Decompilation and Disassembly. You may not reverse engineer, decompile or disassemble, except and only to the extent expressly permitted by applicable law notwithstanding this limitation.
(D) Lease. You may not rent, lease or loan this SOFTWARE PRODUCT.
(E) Support Service. Raise Inh. Thomas Herrmann may provide services ("Support Services") to you in connection with the SOFTWARE PRODUCT. Any supplemental software code provided to you as support services of this SOFTWARE PRODUCT is subject to the terms and conditions of this EULA.
(F) Compliance with Applicable Laws. You must comply with all applicable laws regarding your use of the SOFTWARE.
3. Termination
Notwithstanding any other rights, raise Inh. Thomas Herrmann may terminate this License Agreement if you fail to comply with the terms and conditions of this EULA. In such case, you must delete all copies of the SOFTWARE PRODUCT in your possession.
4. Copyright
All titles, including those not subject to copyright, in and to the SOFTWARE PRODUCT and all copies thereof belong to raise Inh. Thomas Herrmann or its suppliers. All title and intellectual property rights in and to the content that may be created through the use of the SOFTWARE are the property of their respective owners and may be protected by applicable copyright and other intellectual property laws and treaties. This EULA does not grant you any rights to use such content. All rights not expressly granted are reserved by raise Inh. Thomas Herrmann.
5. No warranty
The raise Inh. Thomas Herrmann expressly disclaims any warranty for the SOFTWARE PRODUCT. The SOFTWARE PRODUCT is provided "as is" without any express or implied warranty of any kind. The raise Inh. Thomas Herrmann does not warrant or represent the accuracy or completeness of the information, text, graphics, links or other content contained in the SOFTWARE PRODUCT. The raise Inh. Thomas Herrmann makes no warranty with respect to any damages that may be caused by the transmission of any computer virus, worm, time bomb, logic bomb, Trojan horse or other such computer program. The raise Inh. Thomas Herrmann further expressly disclaims any warranty or representation of any kind to any user or third party.
6. Limitation of liability
In no event shall raise Inh. Thomas Herrmann be liable for any damages whatsoever (including, without limitation, incidental, consequential, or punitive damages) arising out of or in connection with the use of this website.
7. Severability clause
Should individual provisions of this contract be invalid or unenforceable or become invalid or unenforceable after conclusion of the contract, this shall not affect the validity of the remainder of the contract. The invalid or unenforceable provision shall be replaced by a valid and enforceable provision whose effects most closely